3D ART BY JEREMY BIRN |
| PRODUCTIONS: PIRANHA The Piranha . Behind The Scenes . Composite . Tropical . NEXT |
3D ART BY JEREMY BIRN |
| PRODUCTIONS: PIRANHA The Piranha . Behind The Scenes . Composite . Tropical . NEXT |
 I modelled and animated the Piranha in Softimage 3D. This display shows what the model looked like on the screen of the SGI. He is built out of b-spline patches. The upper left window modelling window is in "ghost" mode, which shows overlapping images of the model as it appears in different frames (it is similar to what traditional 2D animators used onionskin paper for). The camera's view of the current frame is seen in the upper right window. The red and blue structure running through the fish is the inverse kinematic skeleton I used to create overall bends and twists (I actually was animating with forward-kinematics, keyframe animating joint rotations). Other motion in the fish, such as the mouth opening, gills opening, and
cycles of motion for the dorsal and lateral fins, were accomplished with
shape animation. To create shape animation, I built multiple versions of
the parts of the fish I was going to animate, for example, I built one version
of the head with an opened mouth, a version with the mouth closed, and a
version with the gills flared outwards. Then these versions were assigned
as target "shapes" for the head, and the "Fcurve" window
on the lower right shows curves I could adjust showing the "weights"
over time that blended these different shapes into the final head pose for
each frame.  Here's a clearer view of the piranha's geometry. Notice that the edges
of the tail and lower fin are actually straight lines, while they have a
more complex shape in the rendering. This is a trick done with transparency
mapping. In addition to a colored pattern coming from a map created in Adobe
Photoshop, I also created a transparency map. Both are shown below for the
lower fin. The transparency map can do 2 things: (1) The white (completely
transparent) parts of the map HIDE a portion of the surface, essentially
trimming it into a new, more complex shape, without needing to model the
details of that shape and (2) Intermediate gray shaded areas of the map
create a partially transparent surface, and the pattern reenforces the ribbed
pattern defined in the color map. 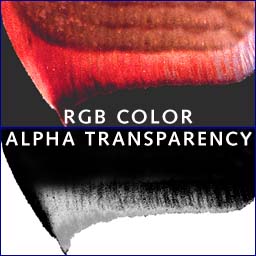 For Softimage, I can actually put the transparency map into the "alpha channel" (4th channel after RGB) of the file, so color and transparency mask are stored in one PICT file from photoshop, and converted into a 4-channel softimage format file on the SGI. Another type of "double-packed" map that I used on most surfaces had specular maps in the RGB channel, and bump in the alpha. For more info on specular maps for characters, see behind the scenes info on how I textured the heads in my thesis (jump there). |